
How to Install a Tongue/Press Lock on your Bag or Necessary Clutch Wallet: Includes instructions for a alternate front flap for your wallet!
11/18/2013 08:46:00 PM
 |
| Press locks available HERE! |
The centre strip of fabric with sides bordered in faux piping add a bit of interest and a fresh new look. Try and not screw up your faux piping like I did. :) It's really bothering me that the piping on the left does not have some of the cute clocks showing. There is nice colour on the fabric of the right piping, but definitely not the left! Darn it!!
I have FOUR new locks coming soon, and I can't wait until they get here. Seriously, cuteness factor is going to soar with my heart locks and the rectangle and square locks will be sophisticated and classy. I can't wait to see them.
Let's get started!
If you intend on doing this in conjunction with the Necessary Clutch Wallet sewing pattern, you will need to read through both this tutorial and the sewing pattern first. YOU MUST! The sewing pattern is available in both PDF (instant download) or printed paper (shipped directly to you...) on my website, emmalinebags.com. Alternatively, you can follow the directions to add these locks to any front bag closure. Try these on a briefcase, messenger bag, or a nice flap over the top of your purse. I kinda love them!

MATERIALS REQUIRED:
Hardware:
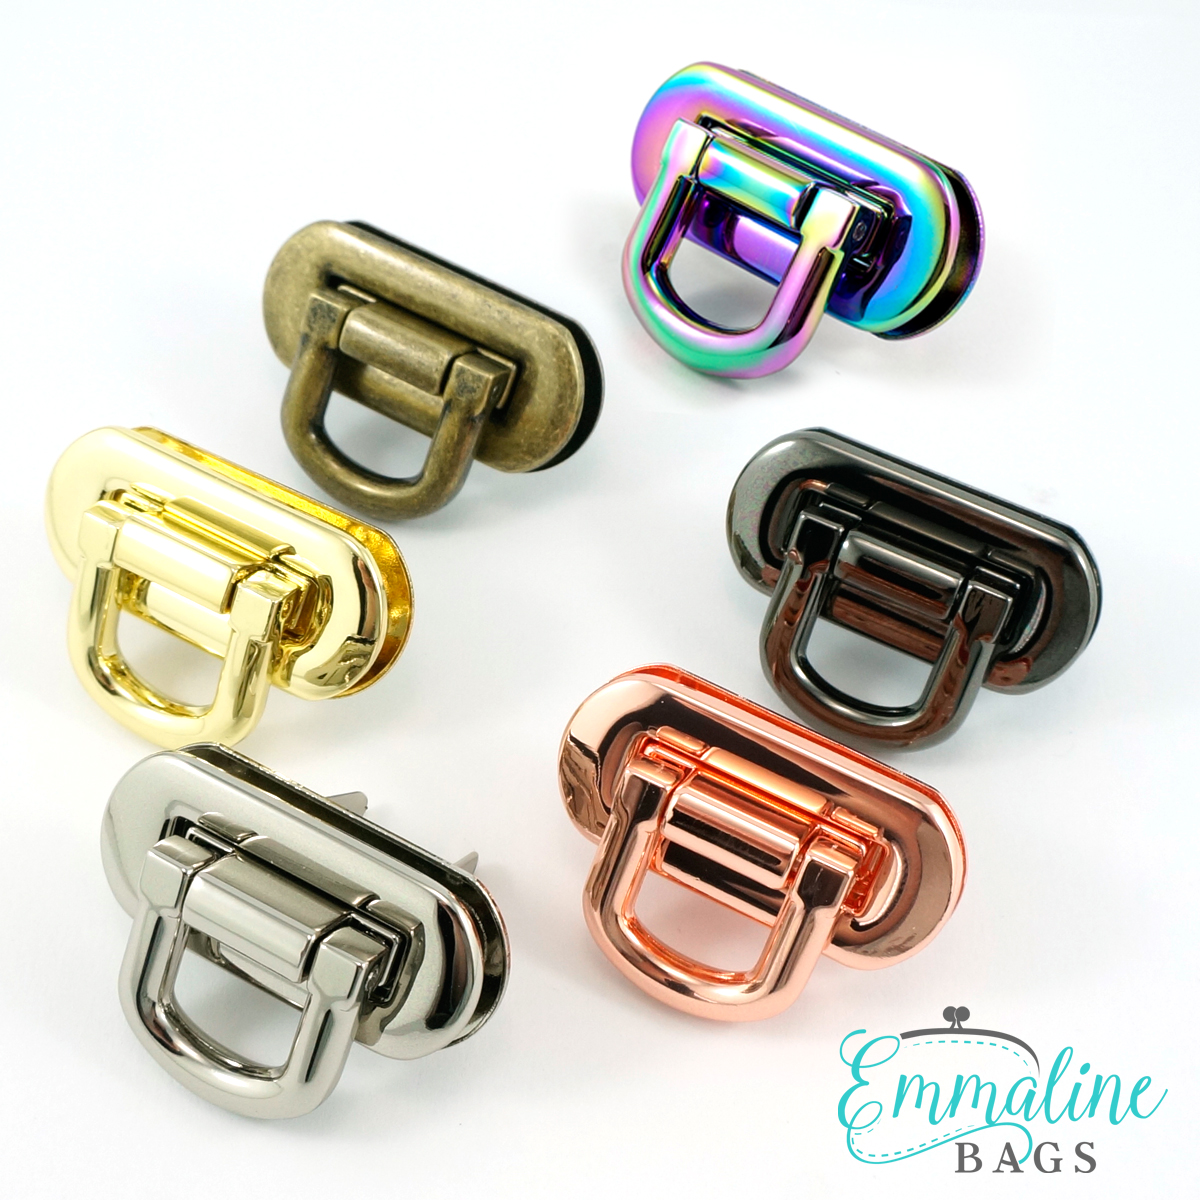
(1) Tongue Lock or "Press Lock" as it is also may be called. This lock comes in four pieces. The U shaped prongs attach the push button part onto your front flap and the flat washer with holes is meant to be hidden inside your bag between the lining and exterior, anchoring the part the push button slides into. Honestly, I have added this lock as an "after thought" to a bag before and the washer was exposed in the inside of the bag and I was still happy with it. You should have parts that look similar to this:
 |
| You can buy these on my website. |
(2) Flap pieces cut from Pattern Piece A (From the Necessary Clutch Wallet Pattern instructions) ONE in exterior material and ONE in lining material, these are already listed in my pattern directions.
(2) Scraps of quilting cotton for faux piping 3/4" (18 mm) wide and at least 6 inches (15 cm) long.
(1) Scrap of fabric to match your exterior fabric that is 1.5" (38 mm) wide and at least 6 inches (15 cm) long.
PLUS: All of the other required fabric listed on the pattern instructions to complete the rest of the wallet.
Interfacing & Stabilizers:
(2) Flap pieces cut from Pattern Piece A, from Fusible WOVEN interfacing, such as Pellon SF101 Shapeflex. (These are already listed in my pattern directions.)
(1) Flap piece cut from Pattern Piece A, from Fusible Batting, such as Pellon Thermolam or 987F.
(1) 7.25" x 8" (18 cm x 20 cm) piece of Fusible Batting, such as Pellon Thermolam or 986F
NOTE: for this Alternate Flap Design, you do not need to cut the Pattern Piece C from Pellon Peltex 71F.
Add Your Interfacing:
1)Trim 1/4" (6mm) from the outside edges of the 2 Pattern Piece A's that were cut from the woven interfacing. Fuse the woven interfacing to the wrong side of your 2 Fabric pattern piece A's, using the manufacturer's directions.
2) Leave off the FUSIBLE BATTING piece for Pattern Piece A for now.
3) According to the pattern instructions, you will be instructed to cut and fuse interfacing to your Exterior Pattern Piece D. After this is done, centre the 7.25" x 8" (18 cm x 20 cm) piece of Fusible Batting, such as Pellon Thermolam or 986F and fuse on according to the manufacturer directions. You can leave off the 1.5" square as that is for the turn lock closure and we are not using that. Here is what it will look like:

Make the Flap:
1) Grab your Pattern Piece A that is cut out of your EXTERIOR fabric and has your piece of woven interfacing already fused to the back. Fold this in half down the middle as shown in the photo below and using a ruler, trim off 1/4" (6 mm) from the folded edge (shown in blue). This cuts the flap into two pieces and trims out 1/2" (12 mm) of fabric that is not needed.

You should have these pieces: Exterior Flap cut in two pieces, one centre strip 1.5" (38 mm) wide, 2 strips for the faux piping that are 3/4" (18 mm) wide, and a Lining Flap piece (not shown).

2) Take your two 3/4" (18 mm) faux piping strips and fold them length-wise, wrong sides together and press with your iron.

3) Align the raw edges of a faux piping strip with the long side of the centre strip, pin in place, and sew to attach using a 1/4" (6 mm) seam allowance (shown in blue). Repeat for the other side.

4) Place one of your front flap pieces, wrong side up over the centre strip as shown. You will be lining up the raw edges of one side of the centre piece with the centre cut edge that you made in Step 1. Pin in place, and then use a 1/4" (6 mm) seam allowance and sew along the raw edges to join them together.

5) Fold open the front flap you just stitched on, finger press the seam open, making sure the seam allowance is pressed toward CENTRE. Press with your iron.

6) Repeat the above steps to sew on, and then press, the other front flap piece onto the other side of the centre strip. Using a straight edge, first mark and then cut across the ends that stick out, making them even and flush with the edges of the front flap piece (I use my rotary cutter and ruler for this).
7) Topstitch! I honestly love topstitching. Some people hate it, but i just love how it gives it that nice finished look. Staying 1/8" (3 mm) or slightly further, from the edges of your faux piping, topstitch on both sides of the centre strip as shown in white.

8) Now you will add your fusible batting piece A to the back of this piece A. First trim about 1/4" (6 mm) of fusible batting away from the outer edges to make it smaller than your fabric piece. Fuse onto the back using a pressing cloth and manufacturer's directions (not shown).
9) Go back to your Necessary Clutch Wallet pattern and start with the first steps in the directions that tell you to sew your exterior and lining pattern piece As together (not shown).
10) After your flap pieces are stitched together, more topstitching!! The secret to great topstitching is your presser foot. Truly it is. If you are not having luck with this, make sure you are using a foot with a clear 1/8" marking or a foot that you can see through, it makes it a lot easier. If you have a machine that allows you to move the needle... MOVE THE NEEDLE!! If you have clear marking on your foot at centre, move the needle to the left 1/8" and use the centre marking on your foot on the outer edges of your flap piece. GO SLOW. Use small stitches so you can get around these tight corners. When you are sewing those two tight corners, you simply must take one stitch, leave needle down, lift presser foot, turn fabric, presser foot down, take a stitch, and repeat until you are around the corner. Do not attempt to just sew around these corners. Do this and it will look fab.
After doing only one row of topstitching below, later I decided it needed two lines of topstitching (another that is 1/4" (6 mm) away) and I came back and did another. So you will not see the second line on this photo, but you will 2 steps down.

1) Slide your button piece of the lock (or the one that is tongue shaped) onto the centre of your front flap piece. Carefully line it up so that it is very straight and with an erasable pen, mark the two holes. Remove the lock piece.

2) Use a tailors awl, or very carefully use a seam ripper, to poke holes where these marks are. Smaller is better!! The prongs will go through a very tiny hole. If desired, use Fraycheck or FrayStop on these two holes, front and back, to prevent fraying.
3) Place the tongue piece back on and push the "U" shaped prongs through the holes, so that they stick out the back.

4) Place the flap on a piece of fabric (to prevent scratching) on a hard surface and use the end of scissors or a screwdriver, or some other hard thing (I like to use anything near by and don't use proper tools) to bend the prongs down so they are nice and tight.

Continue with rest of wallet pattern:
1) Continue sewing the rest of of the Necessary Clutch Wallet pattern as instructed, but MAKE SURE you leave the turning hole open when you are on page 4 on the PDF or page 3 on the PAPER pattern. So this means you sew all the way around the oval of pattern piece D and leave your opening for turning. Turn it right side out, as instructed, but when you are topstitching, DO NOT topstitch the opening closed, you will need to leave this open until later so start your topstitching at the opening and end on the other side of the opening only.
You will follow the pattern instructions until you have stitched the centre box that is shown on the bottom of PAGE 8 on the PDF, and on the bottom of PAGE 7 on the PAPER pattern instructions.
 |
| Here is what your wallet will look like after the rectangle box is stitched in the middle, but you have not attached the side flaps yet. |

 |
| Holes marked for cutting. |

4) Place your lock in the hole and try it out to make sure it is centred. The loop part of the clasp is off centre. Make sure this metal loop is closer to where the top of the wallet is, not the bottom. A spot or two of glue on the back will keep this lock in place.

5) Going through the hole you left open, place the washer over the prongs on the back and fold them tightly over the washer using your scissor tips or a flat screwdriver.

6) Fold the edges of your opening in 1/4" (6 mm) and pin the opening closed. I like to use double sided tap on this opening, it makes it sew easy ;).

7) To make it easier to sew the opening closed, pin back your slot pockets so they are out of the way (see below). Topstitch across your opening starting and stopping at your previous topstitching.

8) Finish your wallet according to the rest of your instructions. There isn't much left to do! Thank you so much for following along. If this is helpful in anyway or you think it will be some day, make sure you PIN it to Pinterest or leave a comment below.
Don't forget to include your finished wallets in my flickr group HERE! There is a lot of inspiration in this group, go have a look!!


12 comments
Ooooooooh! I love this!! Especially the stripe down the middle!!!! Thanks for another variance of The Necessary Clutch!
ReplyDeleteThank you Dani!!! Hurry up and make one so I can see it ;) Janelle
DeleteSuch a lovely variation on the pattern! I think it's so cool you stock paper patterns now too!
ReplyDeleteLove this variation!
ReplyDeleteBy now I'm sure you know how much I love this pattern. This flap variation is so gorgeous!! Thanks Janelle!
ReplyDeleteExcellent! Love this pattern anyway, and now the new latch! Oooo, special! Popped my order in for more goodies and eagerly waiting for the Postman! Can't wait!
ReplyDeleteThank you for the tutorial. I'm loving this variation also!
ReplyDeleteYou are SEW welcome Gina!
DeleteI am still yet to make the NCW but will look forward to trying this version too one day, beautiful designs :)
ReplyDeleteA pdf that we could print off would be awesome instead of running back to my computer a lot. LOL
ReplyDeleteThank you for sharing! It such a fun pattern. I'm going to have to try this. Luv it
ReplyDeleteThanks for this tutorial it helps me a lot. I will share this to my friends right away.
ReplyDeleteYou want to check out deals Lock Installation and Service Locksmith
Note: Only a member of this blog may post a comment.